Since update 20200825 it is possible to store web content resources both in the classical web content of a web application or int the source area, so that it is part of the resources that are loaded by the classloader at runtime.
The following text shows how a separations of projects is simplified if using the “source way” of storing web content resources – because in this case all relevant artifacts of a CaptainCasa project are kept inside a JAR file, which can be easily transferred into other projects.
We separate an application into two projects:
the “base” project with general functions
the “app” project with application-related functions
Example: the “base” project provides the typical first screens of an application: the logon, which then switches to some application page.
The project structure is:

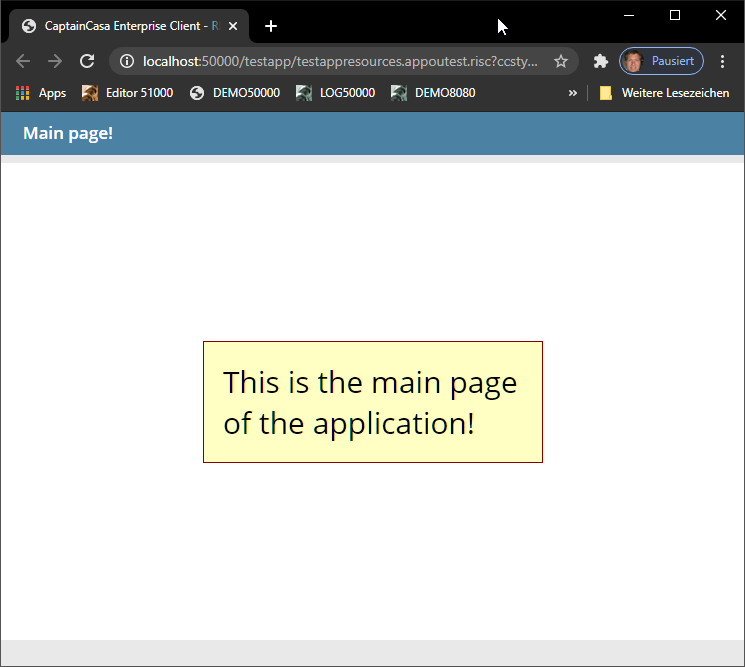
There is an “outest” page, which internally first contains a “logon” page. In case of succesful logon page the outest page switches to a page that is coming from “some application” around.
The layout of the outest.jsp page is:
<t:rowpagebeaninclude id="g_3"
pagebeanbinding="#{d.OutestUI.content}" shownullcontent="true" />
The code is:
package testbase.view;
import java.io.Serializable;
import org.eclnt.editor.annotations.CCGenClass;
import org.eclnt.jsfserver.pagebean.IPageBean;
import org.eclnt.jsfserver.pagebean.PageBean;
import testbase.application.ApplicationAdapterFactory;
@CCGenClass (expressionBase="#{d.OutestUI}")
public class OutestUI
extends PageBean
implements Serializable
{
public interface IListener
{
public IPageBean createAppMainPage();
}
IListener m_listener;
IPageBean m_content;
public OutestUI()
{
showLogon();
}
public String getPageName() { return "/testbaseresources/outest.jsp"; }
public String getRootExpressionUsedInPage() { return "#{d.OutestUI}"; }
public void prepare(IListener listener)
{
m_listener = listener;
}
public IPageBean getContent() { return m_content; }
private void showLogon()
{
final LogonUI ui = new LogonUI();
ui.prepare(new LogonUI.IListener()
{
@Override
public void reactOnLogon(String userName)
{
showApplicationMainPage();
}
});
m_content = ui;
}
private void showApplicationMainPage()
{
m_content = m_listener.createAppMainPage();
}
}
In case of successful logon the outest page is calling method “showApplicationMainPage”. The page to show is not hard code, but is picked from a listener application.
To make the base functions usable for the application project a .jar file needs to be created. The following ANT script is called to do so:
<project name="BUILD" default="BUILD">
<description>Build jar file for project: testbase</description>
<property name="build.targetdirectory" value="../ztemp"/>
<property name="build.jarfilename" value="testbase"/>
<target name="BUILD" description="BUILD">
<delete dir="${build.targetdirectory}" failonerror="false"/>
<mkdir dir="${build.targetdirectory}"/>
<mkdir dir="${build.targetdirectory}/webcontent"/>
<copy todir="${build.targetdirectory}/jarcontent" overwrite="true">
<fileset dir="../webcontentbuild/WEB-INF/classes">
<include name="**/**"/>
</fileset>
</copy>
<echo>Packaging jar file</echo>
<jar destfile="${build.targetdirectory}/${build.jarfilename}.jar">
<fileset dir="${build.targetdirectory}/jarcontent">
<include name="**/**"/>
</fileset>
</jar>
</target>
</project>
In the ANT script all compiled resources (by default located in webcontentbuild/WEB-INF/classes) are packaged into a .jar file. This is the .jar file to distribute.
The “app” project wants to take use of the “base” project. In this example it wants to take over the logon procedure.
The project structure is:
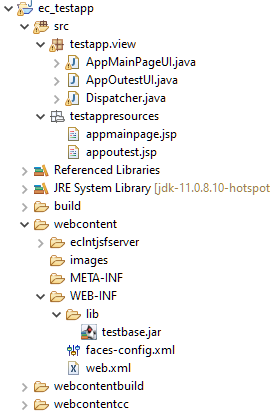
In the project there is an “appoutest” page which internally includes the “outest” page from the “base” project:
<t:rowpagebeaninclude id="g_3" pagebeanbinding="#{d.AppOutestUI.content}" shownullcontent="true" />
The corresponding code is:
package testapp.view;
import java.io.Serializable;
import org.eclnt.editor.annotations.CCGenClass;
import org.eclnt.jsfserver.pagebean.IPageBean;
import org.eclnt.jsfserver.pagebean.PageBean;
import testbase.view.OutestUI;
@CCGenClass (expressionBase="#{d.AppOutestUI}")
public class AppOutestUI
extends PageBean
implements Serializable
{
OutestUI m_content;
public AppOutestUI()
{
m_content = new OutestUI();
m_content.prepare(new OutestUI.IListener()
{
@Override
public IPageBean createAppMainPage()
{
return new AppMainPageUI();
}
});
}
public String getPageName() { return "/testappresources/appoutest.jsp"; }
public String getRootExpressionUsedInPage() { return "#{d.AppOutestUI}"; }
public OutestUI getContent() { return m_content; }
}
The listener that is pass into the “base”-”outest” page is implementing the method “createAppMainPage()” which the returns the page to be shown after the logon.
The only thing the “app” project had to do to incorporate the complete functions of the “base” project was to include the .jar file in its libraries.
If NOT using the “source” way of arranging the web content resources then the effort would be higher and more complex to manage:
The logic class would reside in a .jar file
The web content resources would be located outside the .jar file and would need to be transferred by some additional copy-procedure.
Last remark: both projects were created following the “CaptainCasa project style”. Of course the same principal procedure applies to “Maven style” projects as well. And this is what the next chapter Is about...
When creating a Maven project using the CaptainCasa project archetypes, then the result is a web project – and building the project means the creation of a .war file. (Same with using the archetype for Spring Boot projects: in this case the result is an even bigger .war file, containing the additional Spring Boot runtime.)
The .war file is not the right level of integrating one CaptainCasa project into another – because it contains much more than just the dialog classes and dialog resources. We require – as pointed out in the previous chapter – a “thin” .jar-file to be included by the integrating project.
There are two ways to achieve:
Extract the .jar file from the Maven project and build the Maven artifacts in parallel
Structure the Maven project in a way that it is separated into modules: the one module being a plain “.jar”-module – the other one being a “.war”-module.
The advantage of this solution: you do not have to deal with two projects but work with one project. And: the level of Maven knowledge that is required is considerably low.
Your normal pom.xml build a .war file. The build section looks similar to this:
<build>
<finalName>...</finalName>
<plugins>
<plugin>
<groupId>org.apache.maven.plugins</groupId>
<artifactId>maven-compiler-plugin</artifactId>
<version>3.1</version>
<configuration>
<source>1.6</source>
<target>1.6</target>
</configuration>
</plugin>
</plugins>
</build>
Now you have to tell that there needs to be done something in addition. The first issue is to create an additional jar file.
<build>
<finalName>...</finalName>
<plugins>
...
...
<plugin>
<groupId>org.apache.maven.plugins</groupId>
<artifactId>maven-jar-plugin</artifactId>
<version>3.2.0</version>
<executions>
<execution>
<phase>package</phase>
<goals>
<goal>jar</goal>
</goals>
<configuration>
<classifier>jarextract</classifier>
<includes>
<include>**</include>
</includes>
</configuration>
</execution>
</executions>
</plugin>
</plugins>
</build>
Now a build will create the corresponding jar file in the target directory. The nam of the .jar file is the normal name of the project together with the value of “classifier” (here: “jarextract”), which is concatenated.
So if you build normally builds a “xxxxx.war” file, then now it in addition builds a “xxxxx-jarextract.jat” file.
As next step you need to tell the Maven-build that this .jar file needs to be added to the Maven repository. The corresponding plugin definition is:
<build>
<finalName>...</finalName>
<plugins>
...
...
<plugin>
<groupId>org.apache.maven.plugins</groupId>
<artifactId>maven-install-plugin</artifactId>
<version>2.5.2</version>
<executions>
<execution>
<phase>install</phase>
<goals>
<goal>install-file</goal>
</goals>
<configuration>
<file>target/XXXXX-jarextract.jar</file>
<groupId>yourGroupId</groupId>
<artifactId>yourArtifactId</artifactId>
<version>yourVersion</version>
<packaging>jar</packaging>
<createChecksum>true</createChecksum>
</configuration>
</execution>
</executions>
</plugin>
</plugins>
</build>
Replace the “target/XXXX-jarextract.jar” value with the name of the .jar file that is created in your scenario. And replace the “your...” definitions by your own ones. The artifactId must be different to the one that you use for your project – the project creates the .war-artifact, here you create the .jar artifact.
Now run the Maven-build “clean install” and:
The .jar library will be created.
The .jar library will be installed into the local Maven repository.
You may check the result both in the target-directory of your project and in the /user/xxx/.m2-directory which holds your local Maven repository files.
This way requires some more knowledge about Maven and means that you have to deal with two projects:
One two build the web application (.war)
One two build the library (.jar)
The .war-project references the .jar project as dependency.
The .war project is a just normal CaptainCasa Maven project. So follow the normal guide “Setting up a Maven project”.
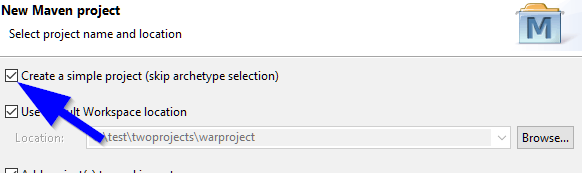
The .jar project is a plain Java-Maven-project – without any additional project archetype required. In Eclipse you may create it by selecting “New => Project... => Maven project” and then selecting “Create a simple project”.
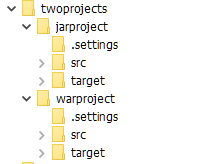
Make sure that both projects are located in the same workspace directory.
Example: the project “warproject” and “jarproject” are created in the following workspace directory “twoprojects”:
The .jar project is the one which you want to use for implementing dialogs that are re-useable in other projects as well. This means: here you store your layout definition, your images and your page bean code.
The project requires the CaptainCasa libraries, so you need to add the following dependencies:
<properties>
<!-- This is the CaptainCasa version to be used. -->
<cc.version>20210517</cc.version>
</properties>
<dependencies>
<dependency>
<groupId>javax.servlet</groupId>
<artifactId>javax.servlet-api</artifactId>
<version>3.1.0</version>
<scope>provided</scope>
</dependency>
<dependency>
<groupId>javax.servlet.jsp</groupId>
<artifactId>javax.servlet.jsp-api</artifactId>
<version>2.3.1</version>
<scope>provided</scope>
</dependency>
<dependency>
<groupId>javax.servlet.jsp.jstl</groupId>
<artifactId>jstl-api</artifactId>
<version>1.2</version>
<scope>provided</scope>
</dependency>
<dependency>
<groupId>org.eclnt</groupId>
<artifactId>eclntjsfserverRISC</artifactId>
<version>${cc.version}</version>
</dependency>
<dependency>
<groupId>org.eclnt</groupId>
<artifactId>eclntjsfserver_jsfimpl</artifactId>
<version>${cc.version}</version>
</dependency>
</dependencies>
You may simply copy the list of dependencies from the .war-project's pom.xml file.
The .war-project use the .jar project, so you need to add the artifacts of the .jar-project into the list of dependencies of the .war-project.
Add into the pom.xml of the .war project the corresponding dependency. Example:
...
<dependencies>
<dependency>
<groupId>jarproject</groupId>
<artifactId>jarproject</artifactId>
<version>0.0.1</version>
</dependency>
<dependency>
<groupId>javax.servlet</groupId>
<artifactId>javax.servlet-api</artifactId>
<version>3.1.0</version>
<scope>provided</scope>
</dependency>
<dependency>
<groupId>javax.servlet.jsp</groupId>
<artifactId>javax.servlet.jsp-api</artifactId>
...
Of course replace the value behind groupId, artifactId and version with the ones from you .jar project.
Now you run the Maven-build:
“clean install” in the .jar project will build the .jar file and will install it into the local Maven-repository.
“clean install” in the .war project will build the .war file (and will also install this one in the local Maven-repository.)
As consequence: the .war file – and the corresponding unpacked version in the target-directory of the .war file will be up to date.
You now may import the .war project into the CaptainCasa toolset, by using the normal “File => Import project...” function and defining the .war project's directory as the one to import.
Now you have to adapt the CaptainCasa project settings: in the concrete situation the web-application is built within the .war-project – but the actual layout definitions and implementations are contained in the .jar-project.
So, adapt the project directory settings as follows:

The directories for keeping the sources, the resources and layouts is not the .war-project but the .jar-project! So adapt these four values to point to the .jar-project. Assuming that both projects reside in the same workspace directory, you may use “../” inside the definition and do not have to define absolute directory names.
Please pay attention: the other definitions are still OK, pointing to the .war-project's directory!
As last step we recommend do “fine-tune” the CaptainCasa project:
The goal of the .jar-project is, to have all parts of the re-useable page bean definitions inside the corresponding .jar file. This means that all resources (layout definitions, images, ...) need to be part of the sources – and must not be lcated in the webcontent.
By settgin the following...
...you automatically restrict the tools to only save and refer file in the source directories of the project.
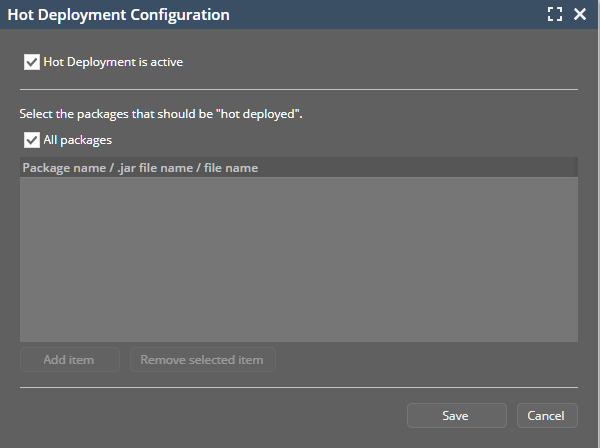
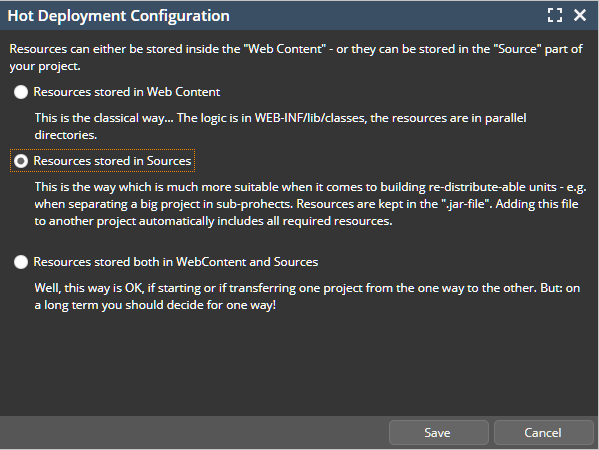
You may in addition activate hot deployment in order to speed up deployment times: